Schedule & Send Emails in Spreadsheets 65 CRX for Google Sheets
A Free Business Tools Add-on
Published By https://www.analyticskiste.blog
Schedule & Send Emails in Spreadsheets (jfmcgoflikkgpilaaencmobegkapljda): Schedule Emails and send your Spreadsheet data automatically to one or more recipients. Convert your sheets in PDF, Excel or CSV.... Read More > or Download Now >
Schedule & Send Emails in Spreadsheets for Google Sheets
Tech Specs
- • Type: Google Sheets Add-on
- • Latest Version: 65
- • Price: Freeware
- • Offline: No
- • Developer: https://www.analyticskiste.blog
User Reviews

- • Rating Average
- 4.25 out of 5
- • Rating Users
- 126
Download Count
- • Total Downloads
- 166
- • Current Version Downloads
- 17
- • Updated: November 24, 2019
Schedule & Send Emails in Spreadsheets is a free Business Tools Add-on for Google Sheets. You could download the latest version crx file or old version crx files and install it.
More About Schedule & Send Emails in Spreadsheets
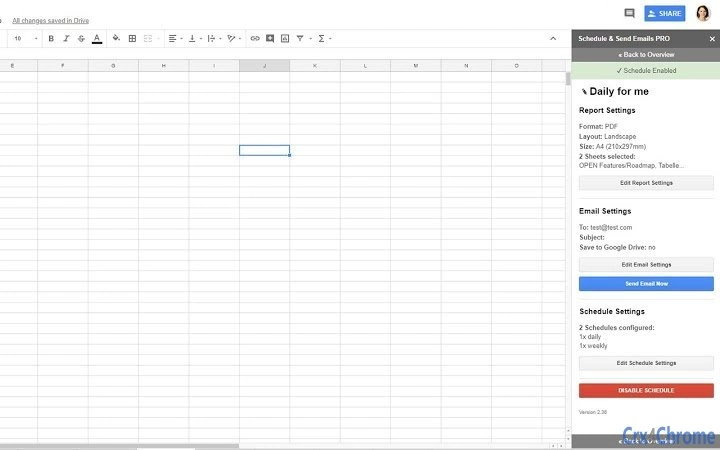
The main idea of the Schedule & Send Emails Add-On is that you schedule emails on a regular basis in order to send Spreadsheet data automatically to the email inbox of your recipients. Optionally you can save your files in Google Drive too e.g. for documentation reasons. Both is especially required when you create reports or dashboards with the use of the Google Analytics Spreadsheet Add-On.
The following settings and features are available:
Report Settings
With the report settings you can define which of your sheets you want to convert. Use the “Edit Report Settings” Button to define your report settings.
You can convert one, several or your entire spreadsheet as PDF, Microsoft Excel, Open Document Spreadsheet or CSV files. For the PDF export you can select all typical PDF settings like the paper size e.g. A4 or A5, paper orientation e.g. portrait or landscape, margin, scale, formatting, etc.
NEW: You can even merge ALL PDF SHEETS IN ONE FILE. This is especially required to work around the Google export limit which allows to only export 5 files per email.
Choose a desired filename including the current date or other dynamic cell values of your spreadsheet or just the current sheet name for your email attachments.
NEW: You can have a preview of your exporting files to check if the formatting corresponds to your desires.
Email Settings
You can then define to whom you send your reports by using the “Edit Email Settings” button. The email settings have the typical email functionalities: A To, CC, BCC, subject and body field.
To send your sheets to several recipients simply add several email addresses in the designated text field and separate several addresses via a semicolon.
To send different sheets with different settings to different recipients you need the “multiple schedules” feature which is available in the PRO version. Simply upgrade to PRO to use it.
Insert dynamic values to your email settings like current date in the email subject or important spreadsheet metrics in the email body.
Save your settings: You can now send the sheet(s) manually to your recipients with the “Send Email Now” button. This is helpful if you want to test your setup and send a test email to you, before you start sending it to e.g. your boss.
This is also helpful when you often need to send Spreadsheet data manually per email but don’t want to export the files and attach it to your email client each time.
Optionally you can save your files to Google Drive too e.g. for documentation reasons. Please note: This is a BETA-feature and will be optimized in future.
Schedule Settings
Next to the manual email sending, set up a schedule on a one time, hourly, daily, weekly and monthly basis for reporting automation. For this, choose the “Edit Schedule Setting” button to open the settings field. Click on “Add” to add a new email schedule. You can create one or several schedules for your spreadsheet.
For example, if you wish to automatically send your reports only on weekdays add five “daily” email schedules - one for each weekday. Note: There is no “weekdays” option. Instead you can add multiple schedules for multiple requirements. This allows you to send your Monday-schedule between 8am and 9am and your Tuesday-schedule between 4pm and 5pm, etc. This makes the Add-On much more flexible and dynamic, instead of adding a static weekday-schedule.
Note: In the free version you can create several schedules but need to send it always to the same recipients. To send different sheets with different settings to different recipients you need the “multiple schedules” feature which is available in the PRO version. Simply upgrade to PRO to use it.
Save your settings and start scheduling your emails by clicking the “Enable Schedule” button. You will be noticed that scheduling is enabled via a green bar at the top of the add-on.
To disable scheduling for one specific person, delete this person from the email address field. Save and schedule your settings again.
To disable scheduling for all persons, click on the “Disable Schedule” button. You will be noticed that scheduling is disabled via a red bar at the top of the add-on.
PRO VERSION: Multiple Schedules
You can upgrade this add-on to the PRO version anytime.
The most important benefit of the PRO version are multiple schedules: With this you can send different sheets with different settings to different recipients. To do so, you can create one or several schedules in the schedule overview menu. For each schedule you can set your report settings, email settings and schedule settings exactly like in the free version.
For example, you can set up a schedule for your marketing department and send your reports on a daily basis. The marketing manager might need the report only once a week: So set up another schedule and send your report on a weekly basis. Also the CEO might need an update but only once a month: So set up another schedule and send your report on a monthly basis as well.
You can rename your schedules to easier manage them like for example Marketing Schedule, Manager Schedule and CEO Schedule.
Save your settings and start scheduling your emails by clicking the “Enable Schedule” button exactly like in the free version. You will be noticed that scheduling is enabled via a green bar right to the schedule name. You will also be noticed about the amount of active schedules via the green bar at the top of the add-on.
Your further PRO benefits:
* Multiple schedule settings
* Unlimited Time Schedules
* Merge several sheets to one PDF file
* Dynamic values for reporting settings
* Premium Support (I answer ALL of your questions within the next 48 hours)
* 14 Days Money-back Guarantee
![]()